|
| CREATE CUSTOM TOP IN R12 |
| Wednesday, July 16, 2008 |
CREATE CUSTOM TOP IN R12
SCHEMA NAME : XXRLT
TOP NAME : XXRLT_TOP
Application : XXRLT Custom Application
Data Group : XXRLTGroup
Request Group : XXRLT Request Group
Menu : XXRLT_CUSTOM_MENU
Responsibility : XXRLT Custom
1) Make the directory structure for your custom application files.
cd $APPL_TOP
mkdir xxrlt
mkdir xxrlt/12.0.0
mkdir xxrlt/12.0.0/admin
mkdir xxrlt/12.0.0/admin/sql
mkdir xxrlt/12.0.0/admin/odf
mkdir xxrlt/12.0.0/sql
mkdir xxrlt/12.0.0/bin
mkdir xxrlt/12.0.0/reports
mkdir xxrlt/12.0.0/reports/US
mkdir xxrlt/12.0.0/forms
mkdir xxrlt/12.0.0/forms/US
mkdir xxrlt/12.0.0/lib
mkdir xxrlt/12.0.0/out
mkdir xxrlt/12.0.0/log
2) Add the custom module into the environment
cd $APPL_TOP
vi customPROD_app01.env
XXRLT_TOP=/sandb1/oracle/PROD/apps/apps_st/appl/xxrlt/12.0.0
export XXRLT_TOP
source the environment file ( /sandb1/oracle/PROD/apps/apps_st/appl/APPSPROD_pkgprod.env )
Make entry to context file
/sandb1/oracle/PROD/inst/apps/PROD_pkgprod/appl/admin/PROD_pkgprod.xml
/sandb1/oracle/PROD/apps/apps_st/appl/xxrlt/12.0.0
cd $INST_TOP/admin/install
sh adgentopfile.sh
Open new session, source environment file, and stop middle tier services, run autoconfig
Open new session, source environment file, check for custom top in topfile.txt in $APPL_TOP/admin, start the middle tier services.
3) create tablespace XXRLT datafile '/sandb1/oracle/PROD/db/apps_st/data/xxrlt01.dbf' size 500M
4) create user xxrlt identified by xxrlt
default tablespace xxrlt
temporary tablespace temp1
quota unlimited on xxrlt
grant connect, resource to xxrlt;
5) Register your Oracle Schema.
Login to Applications with System Administrator responsibility
Navigate to Application-->Register
Application = XXRLT Custom Application
Short Name = XXRLT
Basepath = XXRLT_TOP
Description = XXRLT Custom Application
6) Register Oracle User
Naviate to Security-->Oracle-->Register
Database User Name = XXRLT
Password = XXRLT
Privilege = Enabled
Install Group = 0
Description = XXRLT Custom Application User
7) Add Application to a Data Group
Navigate to Security-->Oracle-->DataGroup
Data Group = XXRLTGroup
Description = XXRLT Custom Data Group
Click on "Copy Applications from" and pick Standard data Group, then add the following entry.
Application = XXRLT Custom
Oracle ID = APPS
Description = XXRLT Custom Application
8) Create custom request group
This will act as a placeholder for any custom reports we wish to make available for the Custom Responsibility (which is defined at a later stage)
Navigate to Security-->responsbility-->Request
Group = XXRLT Request Group
Application = XXRLT Custom
Code = XXRLT
Description = XXRLT Custom Requests
We will not define any requests to add to the group at this stage, but you can add some now if required.
9) Create custom menu
This will act as a placeholder for any menu items we wish to make available for the Custom Responsibility (which is defined at a later stage). We will create
two menus, one for Core Applications and one for Self Service.
Navigate to Application-->Menu
Menu = XXRLT_CUSTOM_MENU
User Menu Name = XXRLT Custom Application
Menu Type =
Description = XXRLT Custom Application Menu
Seq = 100
Prompt = View Requests
Submenu =
Function = View All Concurrent Requests
Description = View Requests
Seq = 110
Prompt = Run Requests
Submenu =
Function = Requests: Submit
Description = Submit Requests
Menu = XXRLT_CUSTOM_MENU_SSWA
User Menu Name = XXRLT Custom Application SSWA
Menu Type =
Description = XXRLT Custom Application Menu for SSWA
10) Create new responsibility. One for Core Applications and One for Self Service (SSWA)
Navigate to Security-->Responsibility-->Define
Responsibility Name = XXRLT Custom
Application = XXRLT Custom
Responsibility Key = XXRLTCUSTOM
Description = XXRLT Custom Responsibility
Available From = Oracle Applications
Data Group Name = XXRLTGroup
Data Group Application = XXRLT Custom
Menu = XXRLT Custom Application
Request Group Name = XXRLT Request Group
Responsibility Name = XXRLT Custom SSWA
Application = XXRLT Custom
Responsibility Key = XXRLTCUSTOMSSWA
Description = XXRLT Custom Responsibility SSWA
Available From = Oracle Self Service Web Applications
Data Group Name = XXRLTGroup
Data Group Application = XXRLT Custom
Menu = XXRLT Custom Application SSWA
Request Group Name = XXRLT Request Group
11) Add responsibility to user
Navigate to Security-->User-->Define
Add XXRLT Custom responsibility to users as required.
12) Other considerations
You are now ready to create your database Objects, custom Reports, Forms, Packages, etc
Create the source code files in the XXRLT_TOP directory appropriate for the type of object. For example forms would be located in $XXRLT_TOP/forms/US or
package source code in $XXRLT_TOP/admin/sql for example.
Database Objects, such as tables, indexes and sequences should be created in the XXRLT schema, and then you need to
a) Grant all privilege from each custom data object to the APPS schema.
For example : logged in as XXRLT user
grant all privileges on myTable to apps;
b) Create a synonym in APPS for each custom data object
For example : logged in as APPS user
create synonym myTable for XXRLT.myTable;
13) Login to sysadmin, Application Developer Responsibility
Application > Form ( Register the form )
Application > Funtion ( Add the form to a function )
Application > Menu ( Attach the function to a menu )
Menu that is added to a particular responsbility is given to specific user
Security > User > DefineLabels: R12 |
posted by Lokesh Babu @ 2:52 AM   |
|
|
|
| ENABLING SSL FOR E-BUSINESS SUITE |
|
Enabling SSL for E-business suite
application version – 11.5.10.2
database version – 9.2.0.6.0
Referred metalink document - 123718.1
Common setups:
Set this following settings in application user .bash_profile.
#su – apple
#vi .bash_profile
SCRIPT_TOP=/u01/oracle1/viscomn/admin/scripts/visclone_visclone/
APACHE_TOP=/u01/oracle1/visora/iAS/Apache/
OPENSSL_TOP=/u01/oracle1/visora/iAS/Apache/open_ssl
OPENSSL_CONF=/u01/oracle1/visora/iAS/Apache/open_ssl/bin/openssl.cnf
Save and quit.
:wq
Provide certificate for HTTP Server:
Creating work directory to keep private key as well as certificate files.
#mkdir /u01/oracle1/viscomn/admin/certs
# mkdir /u01/oracle1/viscomn/admin/certs/apache
Sub-directories:
# mkdir /u01/oracle1/viscomn/admin/certs/apache/ssl.crt
# mkdir /u01/oracle1/viscomn/admin/certs/apache/ssl.key
Edit the following value in .xml file.
#vi /u01/oracle1/visappl/admin/visclone_visclone.xml
/u01/oracle1/viscomn/admin/certs/apache
Checking the value of RANDFILE in OPENSSL_CONF,
It should be
RANDFILE = $ENV::HOME/.rnd
Creating server PEM-encoded private key file(apache_1024.key)
#cd /u01/oracle1/viscomn/admin/certs/apache/
Execute this following command ,
$OPENSSL_TOP/bin/openssl genrsa -des3 -out apache_1024.key 1024
it will ask to enter the PEM pass phrase:oneapps123
(to avoid confusion give common password for all).
Go to file $OPENSSL_CONF,
And edit the follow line
dir = ./demoCA as
dir = . /u01/oracle1/viscomn/admin/certs/apache/
(Specify directory which is created to keep the private and certificate files.
Generating certificate signing request(CSR).
#cd /u01/oracle1/viscomn/admin/certs/apache/
Execute following command,
$OPENSSL_TOP/bin/openssl req -config $OPENSSL_CONF -new -key apache_1024.key -out apache_1024.csr
It will ask following details,
Enter the PEM pass phrase :oneapps123
Country Name(2 letter code) :IN
State or Province Name :Karnataka
Locality Name (e.g., City) :Bangalore
Organization Name :oneAPPS
Organizational Unit Name :httpserver
Common Name :visclone.oneapps.com(hostname of your server)
E-mail Address :kumaran@oneapps.com
Remaining you can skip.
Submitting certificate request(CSR) to certificate authority(CA)
Go to the website www.verisign.com And search “trial certificate”.
Just register for trial certificate and finally it will ask you to submit your CSR, copy the apache_1024.csr
#cat /u01/oracle1/viscomn/admin/certs/apache/apache_1024.csr
And paste in verisign site.(copy full content of the file, Don’t skip anything) And click submit. You will receive the certificate with in a hour.
Creating the server PEM-encoded certificate file
Do the pre-requisites which is mentioned in e-mail, you need to follow only the first step(ROOT CA certificate)
In first link you will get the ROOT CA certificate copy and save in a.cer format in your local machine.
Steps for Microsoft browser.
1. open internet explorertoolsinternet optionscontentcertificatesimportnextselect file types all,select a.ceropennextselect Automatically
select the certificate store based on the type of the certificateOKfinishYes.
Steps for firefox browsers:
1. open firefoxtoolsoptionsAdvancedveiw certificatesAuthoritiesimporta.ceropencheck trust this CA to identity websitesOk.
Then,
Copy the certificate which you received in your e-mail and save it as a apache_1024.crt. then ftp to server
$ ftp 192.9.200.215
Username:apple
Password:apple
ftp>bin
ftp>hash
ftp>cd /u01/oracle1/viscomn/admin/certs/apache/
ftp>put apache_1024.crt
Creating the file of PEM-encoded Server Certificates(ca.crt)
From your local machine,
Open internet explorer.Go to Fileopenbrowse file apache_10247.crt click OK.
In certificate window click certification path on the first linethen view certificatedetailscopy to filenext select Base-64 encoded X.509nextenter
name as caexportclose.
From your local machine,
ftp 192.9.200.215
username:apple
password:apple
ftp>bin
ftp>hash
ftp>cd /u01/oracle1/viscomn/admin/certs/apache/
ftp>put ca.crt
Copy server key and certificate :
In server machine,
#cd $ COMMON_TOP/admin/certs/apache
# cp apache_1024.crt $COMMON_TOP/admin/certs/apache/ssl.crt/server.crt
# cp apache_1024.key $COMMON_TOP/admin/certs/apache/ssl.key/server.key
# cp $APACHE_TOP/Apache/conf/ssl.crt/ca-bundle.crt $COMMON_TOP/admin/certs/apache/ssl.crt/ca-bundle.crt
# cp ca.crt $COMMON_TOP/admin/certs/apache/ssl.crt/ca.crt
Certificate provisioning for Forms 6i Server:
Create wallet directory.
#mkdir $COMMON_TOP/admin/certs/forms/
#su – apple
#cd $ORACLE_HOME/
#xhost +
#export DSIPLAY=192.9.200.215:0.0
#echo $DISPLAY(check display)
#export THREADS_FLAG=native
#cd bin/
#owm
In wallet manager,Newselect No for promptcreate wallet password(oneapps123)OkYes.(A empty wallet created..) it will ask the following details.
Common Name :visclone.oneapps.com
Organizational unit :Forms
Organization :oneAPPS
Locality/City :Bangalore
State Province :karanataka
Country :IN
Key size :512
-Ok. It will show the message certificate was created submit Certificate Authority.Select wallet and check auto login check box is checked.Save in the
location $COMMON_TOP/admin/certs/forms
Submitting Certificate Request(CSR) to Certificate Authority(CA):
Goto www.verisign.com and search for “trial certificate”.Copy and paste the .csr from the wallet to verisign and submit.
Creating the server PEM-encoded certificate file
Do the pre-requisites which is mentioned in e-mail, you need to follow only the first step(ROOT CA certificate)
In first link you will get the ROOT CA certificate copy and save in a1.cer format in your local machine.
Steps for Microsoft browser.
2. open internet explorertoolsinternet optionscontentcertificatesimportnextselect file types all,select a1.ceropennextselect Automatically
select the certificate store based on the type of the certificateOKfinishYes.
Steps for firefox browsers:
2. open firefoxtoolsoptionsAdvancedveiw certificatesAuthoritiesimporta1.ceropencheck trust this CA to identity websitesOk.
Once you received the certificate save as forms_512.crt and ftp to server,
ftp 192.9.200.215
username:apple
password:apple
ftp>bin
ftp>hash
ftp>cd $COMMON_TOP/admin/certs/forms
ftp>put forms_512.crt
ftp>bye
Import User certificate in to Wallet Manager:
In wallet manager OperationsImport user certificatescheck radio for select file contains the certificateOk. Give full path of certificate file where
stored, /u01/oracle1/viscomn/admin/certs/forms/
Highlight the forms_512.crtOk.(see the message at bottom certificate successfully imported).
Got the error!
User certificate import has failed because the CA certificate doesn't exist.
Do you want to import a CA certificate now?
Yescheck the radio button for select the file that contains the certificate/u01/oracle1/viscomn/admin/certs/forms/ and highlight the file CA_root.cerOk.
Configuring SSL with HTTP server
Make the changes in .xml file http to https
#vi /u01/oracle1/visappl/admin/visclone_visclone.xml
%s_url_protocol
%s_local_url_protocol
%s_webentryurlprotocol
%s_frmConnectMode
%s_apps_portal_url
%s_webssl_port keep as 443(default)
%s_active_webport 443
%s_webport 443
"s_forms60_wallet">/u01/oracle1/viscomn/admin/certs/forms
#vi /u01/oracle1/viscomn/html/bin/appsweb.cfg
connectMode=https
Edit scripts in the following location,
#cd $SCRIPT_TOP/adfractl.sh
f60ctl start port=$FORMS_PORT mode=https exe=f60webmx > $FRMLOG 2>/dev/null
#SCRIPT_TOP/adfrmctl.sh
f60ctl start port=$FORMS_PORT mode=https exe=f60webmx > $FRMLOG 2>/dev/null
Through OAMsitemapautoconfig>configuration wizardforms listener servlet enable
OAMsitemapautoconfigconfiguration wizardsslenable
Edit the file,
#vi $COMMON_TOP/portal/visclone_visclone.xml/aplogon.html
https://visclone.oneapps.com/oa_servlets/AppsLogin" target=_top (remove the web listener port)
Clear the cache in this location,
#sh $SCRIPT_TOP/adapcctl.sh stop (root user)
#cd $COMMON_TOP/_pages
#rm –f *
#sh $SCRIPT_TOP/adapcctl.sh start (root user)
Bounce all services once.
If Apache is not starting try to start as a root user. And check the error for Apache logs.Labels: Apps 11i |
| posted by Lokesh Babu @ 2:39 AM |
|
|
|
| R12.AD.A.DELTA.4 PATCH |
| Thursday, July 10, 2008 |
R12.AD.A.DELTA.4
patch-6510214
--Instructions For Applying This Patch
Execute the following command to generate your instance specific installation
instructions
1. Source the Applications environment file
2. Run the Patch Application Assistant by entering "admsi.pl".
--Preparation Tasks
The tasks in this section can be completed without taking any Applications services or users offline.
--Pre-install Tasks
You must shut down all Application tier services before performing the tasks in this section.
AD.A Grants
Run the adgrants.sql script as a user that can connect as SYSDBA to grant privileges to selected SYS objects and create PL/SQL profiler objects.
Usage:
1. Create $ORACLE_HOME/appsutil/admin on the database server.
2. Copy adgrants.sql (UNIX) from this patch directory to
$ORACLE_HOME/appsutil/admin.
Or, copy adgrants_nt.sql (Windows) from this patch directory to
%ORACLE_HOME%\appsutil\admin.
3. Set the environment to point to ORACLE_HOME on the database server.
4. Use SQL*Plus to run the script:
UNIX:
$ sqlplus /nolog
SQL> connect / as sysdba
SQL> @$ORACLE_HOME/appsutil/admin/adgrants.sql
Windows:
C:\> sqlplus /nolog
SQL> connect / as sysdba
SQL> @%ORACLE_HOME%\appsutil\admin\adgrants_nt.sql
--Apply patch
You must apply critical patch 6767273 before applying the AD Mini pack. This patch can not be merged with the AD Mini pack and must be applied separately.
Note: If you have not installed an off-cycle product, you may skip this step. To determine if your environment has an off cycle product, verify the following.
* Check for prod.txt files located under the $APPL_TOP/admin directory.
* For the products found in the directory, make sure there is an entry in the applprod.txt file located under the $APPL_TOP/admin directory
* You must apply patch 6767273 if you have products not listed in the applprod.txt file.
--Apply The Patch
his patch contains the following unified driver file to be applied with
AutoPatch:
u6510214.drv (This is the unified driver)
--Post-install Tasks
You must complete the tasks in this section before starting up Application tier services.Labels: R12 |
| posted by Lokesh Babu @ 5:44 AM |
|
|
|
| Replacing Jinitiator with Sun Java JRE for APPS |
|
PLATFORM : Red Hat Linux AS4
DB : 9.2.0.8
APPS : 11.5.10.2
JINITIATOR : 1.3.1.21
UPGRADING TO : JRE 1.6_05
Download Interoperability patch 6863618
Download the Java Runtime Environment (JRE) 6 plug-in at, http://java.sun.com/javase/downloads/index.jsp
Downloaded JRE Native plug-in file from jre-6_uX-windows-i586-p.exe and rename to j2se160x.exe
(Where X = the version number. Using jre-6u5 as an example this would be j2se16005.exe)
Move the j2se1600X.exe file to the web application tier and place it in [COMMON_TOP]/util/jinitiator
Apply Developer 6i Patchset 18 ( 4948577 )
unzip patch to $ORACLE_HOME
cd $ORACLE_HOME/developer6i_patch18
./patch_install.sh 2>&1 | tee patch_install_p18.log
cd $ORACLE_HOME/procbuilder60/lib; make -f ins_procbuilder.mk install
cd $ORACLE_HOME/forms60/lib; make -f ins_forms60w.mk install
cd $ORACLE_HOME/graphics60/lib; make -f ins_graphics60w.mk install
cd $ORACLE_HOME/reports60/lib; make -f ins_reports60w.mk install
cp developer6i_patch18/bin/genshlib $ORACLE_HOME/bin
Additional Patches
------------------
5713544
sh patch.sh
adrelink.sh force=y "fnd f60webmx"
4261542
cd $ORACLE_HOME
unzip p4261542_600_GENERIC.zip
cp -r $ORACLE_HOME/forms60/java/oracle/forms/handler/AlertDialog.class $ORACLE_HOME/forms60/java/oracle/forms/handler/AlertDialog.class.PRE_BUG4261542
cp -r $ORACLE_HOME/forms60/java/oracle/forms/engine/Main.class $ORACLE_HOME/forms60/java/oracle/forms/engine/Main.class.PRE_BUG4261542
cd $ORACLE_HOME/4261542/oracle/forms/engine
cp Main.class $ORACLE_HOME/forms60/java/oracle/forms/engine/Main.class
cd $ORACLE_HOME/4261542/oracle/forms/handler
cp AlertDialog.class $ORACLE_HOME/forms60/java/oracle/forms/handler/AlertDialog.class
Generate Product JAR Files ( adadmin )
5216496
sh patch.sh
5753922
sh patch.sh
adrelink.sh force=y "fnd f60webmx"
6195758
cd $ORACLE_HOME
unzip p6195758_600_GENERIC.zip
cp -r $ORACLE_HOME/forms60/java/oracle/forms/handler/UICommon.class $ORACLE_HOME/forms60/java/oracle/forms/handler/UICommon.class.PRE_BUG6195758
cp -r $ORACLE_HOME/forms60/java/oracle/forms/handler/ComponentItem.class $ORACLE_HOME/forms60/java/oracle/forms/handler/ComponentItem.class.PRE_BUG6195758
cd $ORACLE_HOME/6195758/oracle/forms/handler
cp UICommon.class $ORACLE_HOME/forms60/java/oracle/forms/handler/UICommon.class
cp ComponentItem.class $ORACLE_HOME/forms60/java/oracle/forms/handler/ComponentItem.class
Generate Product JAR Files ( adadmin )
5938515
sh patch.sh
adrelink.sh force=y "fnd f60webmx"
3830807
sh patch.sh
4586086
cd $ORACLE_HOME
unzip .zip
cd $ORACLE_HOME/forms60/lib
mv env_forms60.mk env_forms60.mk.PRE_BUG4586086
cp $ORACLE_HOME/bug4586086/env_forms60.mk $ORACLE_HOME/forms60/lib
cd $ORACLE_HOME/forms60/lib
make -f cus_forms60w.mk libso_install
adrelink.sh force=y "fnd f60webmx"
relink - adadmin
select 'Maintain Applications Files Menu' and then select 'Relink Applications Program'
Enter list of products to link ('all' for all products)[all] : fnd
Generate specific executables for each selected product [No] ? y
Relink with debug information [No] ? n
Enter executables to relink, or enter 'all' [all] : f60webmx ar60run ar60runb ar60rund *
4888294 (adpatch )
5884875
cd $ORACLE_HOME
unzip p5884875_600_GENERIC.zip
cp -r $ORACLE_HOME/forms60/java/oracle/forms/engine/Main.class $ORACLE_HOME/forms60/java/oracle/forms/engine/Main.class.PRE_BUG5884875
cp -r $ORACLE_HOME/forms60/java/oracle/forms/handler/AlertDialog.class $ORACLE_HOME/forms60/java/oracle/forms/handler/AlertDialog.class.PRE_BUG5884875
cd $ORACLE_HOME/5884875/oracle/forms/engine
cp Main.class $ORACLE_HOME/forms60/java/oracle/forms/engine/Main.class
cd $ORACLE_HOME/5884875/oracle/forms/handler
cp AlertDialog.class $ORACLE_HOME/forms60/java/oracle/forms/engine/AlertDialog.class
Run adadmin "Generate JAR Files"
(6863618)
---------
Apply the Patch Driver using adpatch
Run the txkSetPlugin.sh script from the /6863618/fnd/bin/
txkSetPlugin.sh 16005
Start Oracle Applicatons 11.5.10.2 and start using Java instead of Jinititor for AppletsLabels: Apps 11i |
| posted by Lokesh Babu @ 5:40 AM |
|
|
|
| INDIAN LOCALIZATION PATCH |
|
INDIAN LOCALIZATION PATCH
$FND_TOP/patch/115/sql/afopp002.sql ( FND_CP_GSM_OPP_AQ Queue is Invalidated )
6491231
-------
perl install.pl appspwd=apps japwd=ja
5498551
----------
select count(*) from dba_objects where status='INVALID'
exec sys.utl_recomp.recomp_parallel(8)
select object_name, object_type from all_objects where object_name = 'DBMS_SUPPORT' and object_type like 'PACKAGE%' ;
sqlplus apps/apps @$ORACLE_HOME/rdbms/admin/dbmssupp.sql
sqlplus apps/apps @ja_chk_stat.sql
Note:382829.1 Usage of DFF in India Localization
update MTL_SYSTEM_ITEMS set ATTRIBUTE11 = ATTRIBUTE15;
select owner, table_name from all_tables where table_name = 'JA_IN_INSTALL_CHECK_INFO_D' and owner = 'APPS' ;
perl $JA_TOP/inpatch/indpatch.pl drvr_file=5498551.drv fnd_patchset=H appspwd=apps japwd=ja systempwd=manager
perl compile_il_apps_obj.pl appspwd=apps
sqlplus apps/apps @$JA_TOP/5498551/11_5_3/ja_in_match_lines_v.sql
sqlplus apps/apps @$JA_TOP/5498551/11_5_3/ja_in_po_lines_tax_update_trg.sql
sqlplus apps/apps @$JA_TOP/5498551/11_5_3/ja_in_tds_temp_after_insert_trg.sql
po/po
create index ja_in_rcv_shipment_headers_n1 on rcv_shipment_headers(receipt_num);
create index ja_in_rcv_transactions_n1 on rcv_transactions (rma_reference);
ar/ar
create index ja_in_ra_customer_trx_all_n1 on ra_customer_trx_all(interface_header_attribute1, interface_header_attribute6);
inv/inv
create index ja_in_mtl_transactions_n1 on mtl_material_transactions(rcv_transaction_id);
FNDLOAD apps/apps 0 Y UPLOAD $FND_TOP/patch/115/import/afffload.lct patch/115/import/US/AP_INVOICE_DISTRIBUTIONS_E.ldt
cp backup/resource/CUSTOM.pll $AU_TOP/resource/CUSTOM.pll
f60gen module=CUSTOM userid=apps/apps module_type=LIBRARY
- Go to "Application Developer" Responsibility
- Open View -> Requests
- Click on "Submit New Request"
- Click on "Single Request"
- Enter "Generate Messages" in Name field
- Enter the following parameters
Language : US
Application : Asia/Pacific Localizations
Mode : DB_TO_RUNTIME
- Click Ok and then Submit the request, ensure that request completes successfully
Use "adadmin" utility to compile the menus
6167056
----------
perl $JA_TOP/inpatch/indpatch.pl drvr_file=6167056.drv fnd_patchset=H appspwd=apps japwd=ja systempwd=manager
cp backup/resource/CUSTOM.pll $AU_TOP/resource/CUSTOM.pll
f60gen module=CUSTOM userid=apps/apps module_type=LIBRARY
6079063
--------
perl $JA_TOP/inpatch/indpatch.pl drvr_file=6079063.drv fnd_patchset=H
6410725
------
cp $JA_TOP/6410725/patch/115/import/*.lct $JA_TOP/patch/115/import
perl $JA_TOP/inpatch/indpatch.pl drvr_file=6410725.drv fnd_patchset=H
cp backup/resource/CUSTOM.pll $AU_TOP/resource/CUSTOM.pll
f60gen module=CUSTOM userid=apps/apps module_type=LIBRARY
Attach "India Local Project Billing" responsibility to application user
6410766
--------
perl compile_il_apps_obj.pl appspwd=apps
perl $JA_TOP/inpatch/indpatch.pl drvr_file=6410766.drv fnd_patchset=H
FNDLOAD apps/apps 0 Y UPLOAD $FND_TOP/patch/115/import/afffload.lct patch/115/import/US/RCV_SHIPMENT_HEADERS_2_E.ldt - CUSTOM_MODE=FORCE
i. To add the Custom responsibility:
---------------------------------
a. From the Oracle System Administrator menu, select Security > Responsibility > Define.
b. Enter the following values.
Responsibility Name : XXXXXXXXXX
Application : iSupplier Portal
Responsbility Key : XXXXXXXXXX
Description : XXXXXXXXXX
Available form(Radio button): Select the following
(X) "Oracle Self Service Web Applications"
Data Group:
Name : Standard
Application : iSupplier Portal
Menu : "ILS iSupplier Portal New Application Menu" (Please note that this menu contains personalized IL functions)
c. Apply Securing Attributes to Custom Responsibility
There are three securing attributes that can be used to control access. These attributes
are all seeded with the pre-defined Oracle iSupplier Portal responsibilities that are
released with the product: (Please refer iSupplier implementation guide for details)
? ICX_SUPPLIER_ORG_ID - Identifier for the supplier.
? ICX_SUPPLIER_SITE_ID - Identifier for the supplier site.
? ICX_SUPPLIER_CONTACT_ID - Identifier for the supplier contact.
1. Select Securing Attributes region in Responsibility form, search for the three securing attributes that have to be applied to this responsibility.
2. When you have identified all the attributes to apply to this responsibility,
select ICX_SUPPLIER_CONTACT_ID > click Values button and give ?9999,
select ICX_SUPPLIER_SITE_ID > Click Values button and give -9999.
d. Click Save.
ii. Assign Responsibilities to Users
-----------------------------------------
a. From the Oracle System Administrator menu, select Security > User > Define.
b. Enter the name of the user to whom you wish to grant the responsibility.
c. In the Direct Responsibilities section, enter the custom responsibility in the
Responsibility text box.
d. Click Save.
6410797
--------
perl compile_il_apps_obj.pl appspwd=apps
perl $JA_TOP/inpatch/indpatch.pl drvr_file=6410797.drv fnd_patchset=H
i. To add the Custom responsibility:
---------------------------------
a. From the Oracle System Administrator menu, select Security > Responsibility > Define.
b. Enter the following values.
Responsibility Name : XXXXXXXXXX
Application : Self-Service Web Applications
Responsbility Key : XXXXXXXXXX
Description : XXXXXXXXXX
Available form(Radio button): Select the following
(X) "Oracle Self Service Web Applications"
Data Group:
Name : Standard
Application : Self-Service Web Applications
Menu : "India Local Procurement home" (Please note that this menu contains personalized IL functions)
d. Click Save.
ii. Assign Responsibilities to Users
--------------------------------
a. From the Oracle System Administrator menu, select Security > User > Define.
b. Enter the name of the user to whom you wish to grant the responsibility.
c. In the Direct Responsibilities section, enter the custom responsibility in the
Responsibility text box.
d. Click Save.
iii.Assign User Authorisations
--------------------------
Two new Profiles specific to iProcurement for IL Support are added to System Profile Values to restrict tax modification and entry:
a. ?IL: Access iProcurement Tax information? - Authority to modify IL taxes in iProcurement
b. ?IL: Allow iProcurement RTV CENVAT Process? - Authority to claim CENVAT during iProcurement Return to Vendor transactions.
c. Default values for these profiles are set to ?NO? implying No authorization.System Administrators should set the profile values to each iProcurement users with appropriate values to ensure the proper user authorization levels.
6372361
--------
6053828
6030861
perl $JA_TOP/inpatch/indpatch.pl drvr_file=6372361.drv fnd_patchset=HLabels: Apps 11i |
| posted by Lokesh Babu @ 5:39 AM |
|
|
|
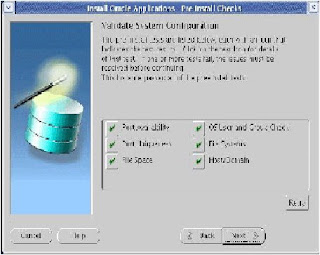
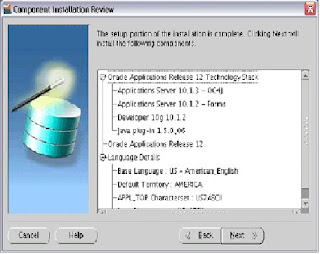
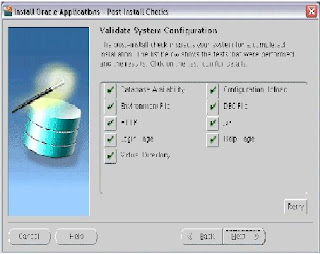
| RELEASE12 INSTALLATION |
|
Disk space requirements:
------------------------
Application node(Fresh & Vision database)- 28GB
Database node for Fresh database - 45GB
Database node for Vision demo database - 133GB
Stage area size - 33GB
Total Space for fresh Install - 73GB
Total Space for Vision - 161GB
Operating System Name Supported Version
--------------------- ------------------
Red Hat Enterprise Linux 4.0-Update 4/higher(32-bit)
Kernel Requirements:
--------------------
The following table lists the required minimum
kernel versions.
Operating System :RedHat Enterprise Linux AS/ES 4.0
Kernel Instructions:2.6.9-42.EL
To determine version, $ uname - r
Required Packages:
-----------------
Check required rpms installed or not (Eg : rpm –q glibc-2.3.4-2.25 )
glibc-2.3.4-2.25
glibc-common-2.3.4-2.25
binutils-2.15.92.0.2-21
compat-libstdc++-296-2.96-132.7.2
gcc-3.4.6-3
gcc-c++-3.4.6-3
libgcc-3.4.6-3
libstdc++-3.4.6-3
libstdc++-devel-3.4.6-3
openmotif21-2.1.30-11.RHEL4.6
pdksh-5.2.14-30.3
setarch-1.6-1
make-3.80-6.EL4
gnome-libs-1.4.1.2.90-44.1
sysstat-5.0.5-11.rhel4
compat-db-4.1.25-9
control-center-2.8.0-12.rhel4.5
xscreensaver-4.18-5.rhel4.11
libaio-0.3.105-2
libaio-devel-0.3.105-2
Sites to Download Rpms:
-----------------------
http://rpm.pbone.net/
http://linuxsoft.cern.ch/
Software Requirements:
----------------------
Check this Softwares installed. (Eg :which ar)
Ar, gcc , g++ , ld , ksh, make, Xdisplay
Kernel Settings:
----------------
Set following kernel parameters in /etc/sysctl.conf
set kernel.semmsl=256
set kernel.semmns=32000
set kernel.semopm=100
set kernel.semmni=142
set kernel.shmall=2097152
set kernel.shmmax=2147483648(half of memory)
set kernel.shmmni=4096
set kernel.msgmax=8192
set kernel.msgmnb=65535
set kernel.msgmni=2878
set fs.file-max=65536
set net.ipv4.ip_local_port_range=1024 65000
set net.core.rmem_default=262144
set net.core.rmem_max=262144
set net.core.wmem_default=262144
set net.core.wmem_max=262144
Domain Name System (DNS) Resolver Parameters:
---------------------------------------------
Following entries to these minimum settings in
the /etc/resolv.conf file on each server node:
options attempts:5
options timeout:15
Verifying Host Names:
Verify that the /etc/hosts file is formatted
as follows:
127.0.0.1 localhost.localdomain localhost
.
Eg: 192.9.200.7 vis.oneapps.com vis
Verify that the /etc/sysconfig/network file is formatted
as follows:
HOSTNAME=vis.oneapps.com
If the /etc/sysconfig/networking/profiles/default/network
file exists, remove it. If you changed any files in the
previous steps, restart the system.
Modifying the Number of Open File Descriptors:
----------------------------------------------
Open the /etc/security/limits.conf file and change
the existing values for "hard" and "soft" parameters as
follows. Restart the system after making changes.
* hard nofile 65535
* soft nofile 4096
* hard nproc 16384
* soft nproc 2047
Net Service Listeners in Multi-user Installations:
$ chmod 777 /var/tmp/.oracle
Creating the Stage Area Directory:
Create directory for staging
$cd /
$mkdir stage
Verify software version (perl).
You must have perl 5.0053 or higher installed, and
it must be in your PATH. Use the following commands
to identify the perl version and its location. The
command is the same for both UNIX and Windows platforms:
$perl -v
Mount the DVD
Run the adautostg.pl script.
$ perl /mnt/cdrom/Disk1/rapidwiz/adautostg.pl
Before starting installation check rapidwiz version:
Current Version of Rapid Install
The most current version of the Rapid Install wizard
is 12.0.0.22. You can obtain this version by applying
patch 5885627, available at OracleMetaLink. To verify
your current version, use the RapidWizVersion
executable, located in the rapidwiz directory on the
Start Here DVD. For example:
UNIX:
$ cd /Stage12/startCD/Disk1/rapidwiz
$ ./RapidWizVersion
To update the Start Here DVD, uncompress the patch in
the main staging area to overwrite the startCD
directory.
For example:
UNIX:
$ cd /Stage12
$ unzip -o p5885627_R12_GENERIC.zip
OS user account settings:
Create group for user
$groupadd dba
$useradd –g dba oracle
$useradd –g applmgr
Change read write execute permission and ownership
to directories where going to install application
and database
$chmod 777 /u01
$chmod 777 /u02
Start installation
$ /stage/Stage12i/startCD/Disk1/rapidwiz/rapidwiz
Screen Shots:
-------------
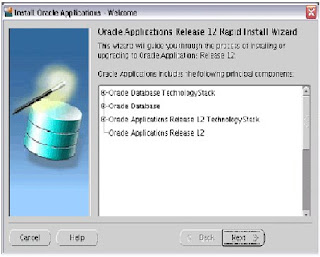
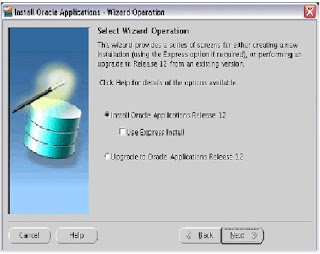
Choose decline-->

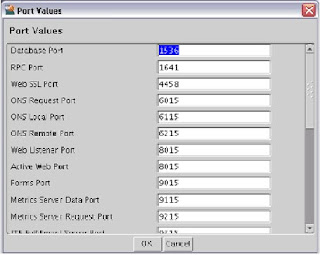
Choose the portpool-->

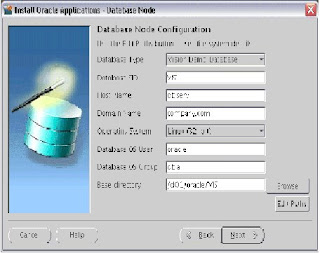
Give database node information-->
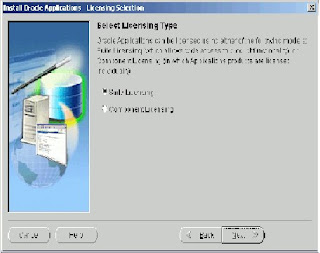
Choose license type-->
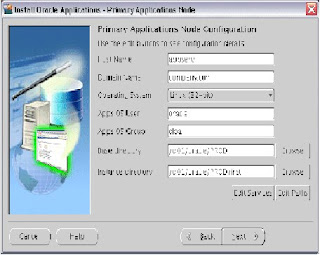
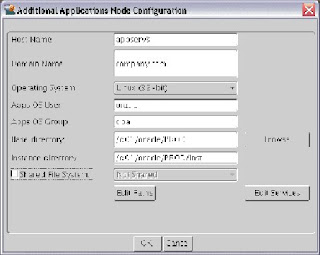
Give application node information-->
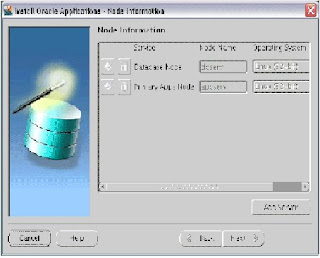
Here you can see the system architecture-->

References:
-----------
Metalink Note: 402310.1
Oracle Applications Installation and Upgrade
Notes Release 12 for Linux (32-bit)
Metalink Note: 405565.1
Oracle Applications Release 12 Installation
Guidelines
Metalink Note: 405293.1
Oracle Applications Release Notes Release 12
B31295-04
http://download.oracle.com/docs/cd/B40089_05/current/
acrobat/120oaig.pdfLabels: R12 |
| posted by Lokesh Babu @ 5:36 AM |
|
|
|
| LINUX BASICS |
|
Linux How-To
Although i have been working with Oracle Application all various Unix flavors my favorite one has been Linux. In today's post i will shift focus from Oracle Applications and discuss some tips for doing some frequently used tasks on the Operating System.
This post is my first in a series of posts which i intend to put up here on the operating system. Although most of you would be using these quite frequently I just though of putting them in one place.
Finding Your Linux Release
The first set you would require to do most of the times as an Applications DBA before you start installing or troubleshooting is to find out the version of Linux you are running.
This you can get from a static file redhat-release located in the /etc directory
view /etc/redhat-release
Red Hat Enterprise Linux AS release 4 (Nahant Update 2)
NFS mounting on Linux
Most often it is required to do a NFS mount of your disks across different servers. This particularly useful for doing Applications Installations and Patching. There are two aspects of configuration involved here. One is the sever that is the which is sharing the file system and the other is client which the host that is mounting the shared file system.
Supposing you want to mount a u01/sam on Node_A to Node_B
Configurations on Node_A
edit the /etc/exports file
vi /etc/exports
add the filesystem to mount
/u01/sam ro Node_B
you can either use the option ro which means read only or in case you wish to allow node_b to write into the filesystem use the rw option which is read writeable.
The change in exports file takes effect only after the restart of your NFS service daemon. use the service command to do that.
# service nfs restart
Shutting down NFS mountd: [ OK ]
Shutting down NFS daemon: [ OK ]
Shutting down NFS quotas: [ OK ]
Shutting down NFS services: [ OK ]
Starting NFS services: [ OK ]
Starting NFS quotas: [ OK ]
Starting NFS daemon: [ OK ]
Starting NFS mountd: [ OK ]
Configuration for Node_B
On Node_B simply create the mount point to hold the shared file system and mount it using the mount command.
#mkdir sam
#mount -t nfs Node_A:/u01/sam /sam
Setting Kernel Parameters
Most oracle products require certain kernel parameters to be set as a pre requisite for installation. Common kernel parameters include parameters for shared memory .
The /etc/sysctl.conf file takes care of your kernel parameters.
#vi /etc/sysctl.conf
kernel.shmmax = 2147483648
kernel.shmmni = 128
kernel.shmall = 2097152
kernel.sem = 250 32000 100 128
fs.file-max = 65536
net.ipv4.ip_local_port_range = 1024 65000
However changes made to this file take effect only after the next reboot.
The sysctl command can be used to set the kernel parameter at runtime in linux.
sysctl -w kernel.shmmax=2147483648
You must however make the change in the /etc/sysctl.conf so that it is permanent.
Increasing the Swap space at runtime
Imagine this, you start the OUI and your pre installation check fails due to insufficient swap space. Now I agree that you got to check all this before starting the installation but just in case you missed it. You could always increase it on the fly.
Check the memory on your server
# free -m
total used free shared buffers cached
Mem: 8117 3204 4913 0 77 2648
-/+ buffers/cache: 478 7639
Swap: 101 0 101
Now say you need to increase it by 500 MB for your server, first locate a place you can spare this 500 MB in my case i found it in /u01
Use the dd command to create a swapfile
#cd /u01
# dd if=/dev/zero of=swapfile bs=1024 count=512000
512000+0 records in
512000+0 records out
# ls -ltr
drwx------ 2 root root 16384 May 1 2006 lost+found
-rw-r--r-- 1 root root 524288000 Nov 28 13:58 swapfile
Next issue the following two commands
# mkswap swapfile
Setting up swapspace version 1, size = 524283 kB
# swapon swapfile
Now check you memory again
# free -m
total used free shared buffers cached
Mem: 8117 2176 5941 0 45 1975
-/+ buffers/cache: 155 7962
Swap: 601 0 601
Bingo! here is your increased SWAP.
To make this change permanent add the line in your etc/fstab
/u01/swapfile swap swap defaults 0 0Labels: linux/Unix |
| posted by Lokesh Babu @ 5:27 AM |
|
|
|
| Apply ADI-6 Patch |
|
Apply ADI-6 Patch
Download patch 6502082
Open read me 233044.1
Check for pre requisites
• Before apply patch down the apps server and enable maintenance mode
To check weather maintenance mode enabled
select fnd_profile.value('APPS_MAINTENANCE_MODE') from dual;
Before apply patch check for system requirements
• Perl executable
You must have the Perl executable (5.004 minimum; 5.005 perferred) in your PATH before you apply this minipack. You should have already installed Perl as part of your iAS ORACLE_HOME. See http://www.cpan.org for information on obtaining Perl.
• FNDLOAD executable
Ensure all application tier server nodes contain the FNDLOAD executable in the $FND_TOP/bin directory
Unzip apps.zip under $JAVA_TOP on all application tier nodes, if you have not done so already.
Convert to Multiple Organizations
Oracle Applications strongly recommends that you convert to Multi-Org as soon as possible so that you will be prepared for improvements to performance across the E-Business Suite as well as support for Multi-Org Access Control.
see Release 11i Use of Multiple Organizations in Oracle Applications (OracleMetaLink Document 210193.1). related doc284046 and 2451368
Apply the Minipack
Adpatch driver=.drv logfile=.log
Check for invalid objects before applying patch and check after apply patch by using following command
--To check the Invalid Objects
SELECT count(1) FROM dba_objects WHERE status='INVALID';
$FND_TOP /patch/115/sql/afoppool.sql (for compile queue objects)
--To Recompile Invalid Objects
EXEC SYS.UTL_RECOMP.RECOMP_PARALLEL(8);
Post-minipack Steps
Step 1: Grant privileges and create PL/SQL profiler objects
Run the adgrants.sql script as a user that can connect as SYSDBA to grant privileges to selected SYS objects and create PL/SQL profiler objects.
1. Create $ORACLE_HOME/appsutil/admin on the database server.
2. Copy adgrants.sql (UNIX) from $APPL_TOP/admin to $ORACLE_HOME/appsutil/admin. Or, copy adgrants_nt.sql (Windows) from %APPL_TOP%\admin to %ORACLE_HOME%\appsutil\admin.
3. Set the environment to point to ORACLE_HOME on the database server.
4. Use SQL*Plus to run the script:
UNIX:
$ sqlplus /nolog
SQL> connect / as sysdba
SQL> @$ORACLE_HOME/appsutil/admin/adgrants.sql
Windows:
C:\> sqlplus /nolog
SQL> connect / as sysdba
SQL> @%ORACLE_HOME%\appsutil\admin\adgrants_nt.sql
Step 2: Unzip apps.zip under $JAVA_TOP (conditionally required)
If you have already unzipped apps.zip, go on to Step 3.
Verify whether apps.zip has been unzipped. If the file exists in your $JAVA_TOP directory, it has not been unzipped. If it doesn't exist in $JAVA_TOP, it has already been unzipped.
Step 3: Run AutoConfigLabels: 9I |
| posted by Lokesh Babu @ 5:16 AM |
|
|
|
| 11I INSTALLATION(11.5.10.2 on Redhat Linux AS 4.0 (Multi Node )) |
|
Installation Instructions for Oracle Application Server 11.5.10.2 on Redhat Linux AS 4.0 (Multi Node )
Environment Name: REDHAT AS4 Machine:
Configuration of machines and OS
Configuration of Machines :-
2 GB RAM
150 GB HDD
Pantium IV 3 GHZ
DVD Rom
Operation Systems :-
Machine 1 :- apps01
Windows 2000 professional (50 GB, Primary Partition FAT32 *)
REDHAT Linx AS 4 (100 GB)
Machine 2 :- apps02
REDHAT Linx AS 4 (150 GB)
Installation of OS
Machine 1 :- apps01
Windows 2000 professional
- Install windows 2000 professional and create primary partition FAT32 so that you can mount on linux.
- Apply service pack 4.0
Redhat Linux AS 4.0
- Create Mount points as follows
Mount File system Size
/ Ext3 1GB
/boot Ext3 122MB
/ebis Ext3 79GB
/home Ext3 1GB
/opt Ext3 1GB
/var Ext3 1GB
/tmp Ext3 2G
/swap Ext3 4GB
/usr Ext3 10GB
- Select everything in custom selection of packages.
Machine 2 :- apps02
- Create Mount points as follows
Mount File system Size
/ Ext3 5GB
/boot Ext3 122MB
/ebis Ext3 114GB
/home Ext3 6GB
/opt Ext3 1GB
/var Ext3 2GB
/tmp Ext3 4G
/swap Ext3 4GB
/usr Ext3 10GB
- Select everything in custom selection of packages during linux installations
Prerequisite
Staging on Windows 2000 professional – Machine 01
1. Prerequisite
- Install and configure IIS 5.0 or above. It is prerequisite to run perl
- Download perl 5.8.8.8.7 from www.perl.com and install it. This is prerequisite for staging.
- Check the following DVD’s
Oracle Application 11i Start Here Disk 1
Oracle Application Rapid Install RDBMS Disk1
Oracle Application Rapid Install Database Disk1 to Disk4
Oracle Application Rapid Install Tools Disk1
Oracle Application Rapid Install Appl_Top Disk 1 & Disk2
2. Insert Oracle Application 11i Start Here Disk 1 in DVD ROM drive
3. execute perl < DVDdrive>\mnt\cdrom\disk1\rapidwiz\adautostg.pl
4. Setup the stage Area Direcoty
At the prompt for the stage directory, enter the name of the system top-level
directory. The Rapid wizard stage11i directory will be created in this path.
5. When the script prompts select 1 (Oracle Applications) .
6. Insert the correct DVD’s as prompted by script
7. Staging will take approximately 25GB
Staging on Redhat Linux 4.0 AS– Machine 02
1. Check the following DVD’s
• Oracle Application 11i Start Here Disk 1
• Oracle Application Rapid Install RDBMS Disk1
• Oracle Application Rapid Install Database Disk1 to Disk4
• Oracle Application Rapid Install Tools Disk1
• Oracle Application Rapid Install Appl_Top Disk 1 & Disk2
2. Log in as Root and Check the current version of the perl installed
perl –v
it should be 5.8.5 or later
3. Mount the dvd rom
mount /dev/dvd /mnt/dvdrom
4. execute perl < DVDdrive>/dev/dvd/mnt/cdrom/disk1/rapidwiz/adautostg.pl
Setup the stage area At the prompt for the stage directory, enter the name of the system top-level directory. The Rapid wizard stage11i directory will be created in this path.
5. When the scripts prompts select 1 (Oracle Applications)
6. Insert the CD’s as prompted by the script
(Note : even Automount enabled DVD has to be unmounted from and remounted
umount /mnt/dvdrom
umount /dev/dvd
mount /dev/dvd /mnt/dvdrom and press enter
Pre-Installation Steps
Preparing the Operating systems for Oracle 11.5.10.2
Check the following packages
Required RPMS Installed RPMS
• compat-db-4.1.25-9
• compat-gcc-32-3.2.3-47.3
• compat-gcc-32-c++-3.2.3-47.3
• compat-oracle-rhel4-1.0-5
• compat-libcwait-2.0-2
• compat-libgcc-296-2.96-132.7.2
• compat-libstdc++-296-2.96-132.7.2
• compat-libstdc++-33-3.2.3-47.3
• xorg-x11-deprecated-libs-devel-6.8.1-23.EL
• xorg-x11-deprecated-libs-6.8.1-23.EL
• openmotif21-2.1.30-11.RHEL4.4
• libaio-0.3.102-1
• libaio-devel-0.3.102-1 • compat-db-4.1.25-9
• compat-gcc-32-3.2.3-47.3
• compat-gcc-32-c++-3.2.3-47.3
• compat-oracle-rhel4-1.0-5
• compat-libcwait-2.0-2
• compat-libgcc-296-2.96-132.7.2
• compat-libstdc++-296-2.96-132.7.2
• compat-libstdc++-33-3.2.3-47.3
• xorg-x11-deprecated-libs-devel-6.8.1-23.EL
• xorg-x11-deprecated-libs-6.8.1-23.EL
• openmotif-2.2.3-6.RHEL4.2
• libaio-0.3.102-1
• libaio-devel-0.3.102-1
The libaio components are available on Disk 3 of the RHEL4.0 media. For information on downloading the openmotif component, see the instructions at the following URL:
https://rhn.redhat.com/errata/RHSA-2005-412.html
1.1. After installing these patches, run ldconfig -v.
(Note : ldconfig creates the necessary links and cache to the most recent shared libraries found in the directories specified on the command line, in the file /etc/ld.so.conf, and in the trusted directories (/lib and /usr/lib). The cache is used by the run-time linker, ld.so or ld-linux.so. ldconfig checks the header and file names of the libraries it encounters when determining which versions should have their links updated )
1.2. Verify minimum Kernel Requirements with uname and rpm command,
[root@vision ~]# uname -r
2.6.9-5.ELsmp
[root@vision ~]# rpm -q glibc
glibc-2.3.4-2
1.3. Domain Name System (DNS) Resolver Parameters
Edit the following file /etc/resolv.conf and set the following parameters as below,
options attempts:5
options timeout:15
(Note : The resolv.conf file resides in the /etc directory and contains the IPs of domain name servers that you will probably need if you are going to do anything on the internet.
options :Allows certain internal resolver variables to be modified. The syntax is where option is one of the following
timeout: n (IN SECONDS)
sets the amount of time the resolver will wait for a response from a remote name server before retrying the query via a different name server.
attempts: n
sets the number of times the resolver will send a query to its name servers before giving up and returning an error to the calling application).
1.4. Host names
1.4.1. The format of hosts /etc/hosts file must be formatted as follows :
127.0.0.1 localhost.localdomain
.
(In apps01 hosts file make this entry and there should be entry for the other nodes which hosts the servers)
192.9.200.149 apps01.oneapps.com local_host
192.9.200.146 apps02.oneapps.com
(In apps02 the following entries to the /etc/hosts file has to be added )
192.9.200.146 apps02.oneapps.com local_host
192.9.200.149 apps01.oneapps.com
Ping the remote machine with and hostname and check
Comment the first line in the /etc/hosts file
1.4.2. Verify that the /etc/sysconfig/network file is formatted as follows :
HOSTNAME=.
Exi : HOSTNAME=apps01.oneapps.com
( Note : Make sure that your machines has static ip address)
1.5. If the /etc/sysconfig/networking/profiles/default/network file exists, remove it.
Note: If you changed any files in the previous steps, reboot the system.
1.6. Modify number of open descriptors: in file /etc/security/limits.conf add the following lines:
hard nofile 65535
soft nofile 4096
(.You can protect against certain types of denial of service attacks by modifying /etc/security/limits.conf. This file sets limits on system resources for each user.. The above setting limits the maximum number of files open)
1.7. Change port range value : /etc/sysctl.config add the following line,
net.ipv4.ip_local_port_range = 1024 65000
1.8. Set LD_ASSUME_KERNEL in file /etc/profile
LD_ASSUME_KERNEL=2.4.19
export LD_ASSUME_KERNEL
1.9. Apply one of these OS library patches: 4198954 (for Red Hat 4.0), you can download it from metalink.
The above patch contains compat_libcwait-2.0-2.i386.rpm, compat-oracle-rhel4-1.0.-5.i386.rpm
After applying the compat-libcwait-2.0-2.i386.rpm move the libcwait.so - library from /usr/lib to /lib and modify the path in /etc/ld.so.preload
2.0 Create a goup and two users one owner of database and other owner of oracle application
groupadd dba
useradd –g dba –G dba oracle
useradd –g dba –G dba applmgr
passwd oracle
passwd applmgr
Installation Steps
Installation of database server
Machine :- apps01
Go to the following directory in your staging
/ebis/Stage11i/startCD/Disk1/rapidwiz
./rapidwiz
Press next for welcome screen
Select Installation option
Install Oracle Applications E-Business 11i
Load Configuration
No
Install Type
Multinode
Node Information
Database :- apps01
Administration :- apps01
Concurrent Manager :- apps01
Application :- apps02
Web:- apps02
Define Database type
Fresh Database ( PROD)
Database install information( Folder or Mount point)
/ebis
Database install information
Oracle OS User :- oracle
Oracle OS Group :- dba
Base Install Directory :- /ebis
Select Licensing Type
E-business Suite Licensing
Select Language
American English
Character Set
Default
Port Pool
Default
Configuration File path.
/tmp/config.txt
Follow the installation step upto completion of installation.
Application Server Installation.
Machine :- apps02
Copy the configuration file from apps01.
ssh apps01.oneapps.com cat /tmp/config.txt > /tmp /config.txt
Go to the following directory in your staging
/ebis/Stage11i/startCD/Disk1/rapidwiz
./rapidwiz
Press next for welcome screen
Select Installation option
Install Oracle Applications E-Business 11i
Load Configuration
Yes
Install Type
Multinode
Node Information
Database :- apps01
Administration :- apps01
Concurrent Manager :- apps01
Application :- apps02
Web:- apps02
Define Database type
Fresh Database ( PROD)
Database install information( Folder or Mount point)
/ebis
Database install information
Oracle OS User :- oracle
Oracle OS Group :- dba
Base Install Directory :- /ebis
Select Licensing Type
E-business Suite Licensing
Select Language
American English
Character Set
Default
Port Pool
Default
Configuration File path.
/tmp/config.txt
Follow the installation step upto completion of installation.
Include a subset of test steps that will confirm that the customization has been installed properly.
Post- Installation Steps
Apply patch 4632932 to all the application tiers, then re-source the applications environment file to refresh the environment variables. This patch is required for setting the values for LD_ASSUME_KERNEL and LD_PRELOAD.
Steps to Apply this patch
1. Connect as user applmgr on Application server
2. download patch 4632932 from metalink
3. Create a directory called patch in /ebis and unzip downloaded patch in this directory
4. Run adadmin utility and put the database into maintenance mode (type adadmin at shell prompt and it will guide you to put the application in maintenance mode .
5. Apply the patch using adpatch utility
6. After applying the patch disable the maintenance mode
7. Repeat the same on the host where the Database server installedLabels: Apps 11i |
| posted by Lokesh Babu @ 4:34 AM |
|
|
|
|
| About Me |
|

Name: Lokesh Babu
Home: Bangalore, Karnataka, India
About Me:
See my complete profile
|
| Previous Post |
|
| Archives |
|
|
| Links |
|
|
| Template by |

 |
|


